Review Problems for Ruby, JavaScript, Prolog, and Scala
We have written 4 review problems for the lecture today, one for each of the four languages we've covered thus far.
The problems can be found below:
We have written 4 review problems for the lecture today, one for each of the four languages we've covered thus far.
The problems can be found below:
We have finally finished writing the Prolog assignment. It includes three problems, with one optional extension and one bonus problem. The assignment will be due next Wednesday, March 6 at 11:59PM.
The assignment document is called 2013-02-18-assignment.md and the skeleton files can be found under the assignments folder.
Please remember to fork the Prolog repo and push your solutions to your forked repo. You can always manually submit to the autograder.
The slides from lecture can be found here.
The Prolog Assignment is now live and complete.
Again, please feel free to post questions on issues.
Hope you will find this assignment to be slightly easier.
We have released the solutions to the JavaScript assignment.
This assignment is quite a bit shorter and easier than the Ruby assignment.
The only tricky part to the assignment has to do with the seed values for the reduce function in question #4. Take a look at the solution to the problem for how to properly detect whether the optional seed value is passed in and provide the correct default seed value if it's not.
In the second Prolog lecture, we posed the 3 practice problems from the textbook:
While these are not problems particularly well-suited for Prolog, at least not in the same way as Sudoku and Queens are, they aim to help you understand how to using recursion with lists. This is one of the most important and most commonly used technique to help you describe and solve problems in Prolog.
We have posted our solutions to these three problems. Please take a look and feel free to post any questions on Github.
We will also briefly go over these solutions at the beginning of our next class.

With our last lecture, we have finished the material for JavaScript. The slides from lecture can be found here.
The JavaScript Assignment is now live and complete. It includes four problems, with one bonus problem. The assignment will be due next Wednesday, February 13 at 11:59PM.
The assignment document is called 2013-02-03-assignment.md and the skeleton files can be found under the assignments folder.
Please remember to fork the JavaScript repo and push your solutions to your forked repo. You can always manually submit to the autograder.
Again, please feel free to post questions on issues.
Hope you will find this assignment to be slightly easier.
The waterfall function is part of a very widely used JavaScript Library called async.js. It helps manage the complexity and callbacks for a series of functions that depend on the result of a previous functions.
A similar function also available in the async library is parallel. It allows you to fire off many requests in parallel and collect the results with a single callback function. We mentioned this function in lecture and we have published a simpler version of the parallel function that takes in a hash. Please take a look for reference and hopefully it will help you understand what's required for the waterfall function
If you forked the repo before we finalized the assignment. Please use the following commands to update your repo:
1 2 | |
Let us know if you are having trouble with git.
We have created a survey for the course regarding the instruction quality so far and the difficulty of both the material and homework. Please take a moment to fill it out; we would really appreciate it, as it helps us improve the course for everyone.
All responses are anonymous, so feel free to answer earnestly.

We will be using the Node.js runtime as the interpreter for JavaScript.
Node.js is a platform built on Chrome’s JavaScript runtime for easily building fast, scalable network applications. Node.js uses an event-driven, non-blocking I/O model that makes it lightweight and efficient, perfect for data-intensive real-time applications that run across distributed device
To install it, simply go to the Node Home page and click on the install button.
See you tuesday!
![]()
With our last lecture, we have finished the material for Ruby. The slides from lecture can be found here.
The Ruby Assignment is now live. It includes five problems, two of which are from the book. The assignment will be due next Friday, February 1 at 11:59PM.
To get started, fork the Ruby repo, which will create a repo of the same name under your github account. This allows us to keep track of everyone's progress. Then clone your own forked repo and you are ready to go. From there, you can commit and publish your changes.
The assignment document is called 2013-01-23-assignment.md and the skeleton files can be found under the assignments folder.
You can submit your solution in one of two ways.
The solutions to all the book problems except for Tree and CSV are also live. You can find them here.
Again, please feel free to post questions on issues.
Most Unix-like systems like Mac OS X or Linux distributions will come with Vim installed already. However, you may want to upgrade vim for better compatibility or new features. Here, we will cover some of the recommended ways to install vim.
TL;DR: Here is a link to the vim dotfiles recommended for a base configuration.
One option to install Vim for OS X is to use MacVim, a GUI version of vim. Simply download and install MacVim from its project page's Downloads tab. Installation just requires unarchiving the .tbz file (Archive Utility should be able to do this for you by double clicking on the archive). Finally, drag and drop the MacVim.app bundle into your /Applications/ folder.
Alternatively, you can use brew to install MacVim. If you prefer a terminal-based vim, than you can run the following commands with brew:
1
| |
You can download the latest version of vim directly from the vim webpage. This includes the binaries for the 32-bit and 64-bit version of Windows.
Alternatively, you can install a command-line version of vim through Cygwin, a Unix-like environment and CLI for Windows. First install Cygwin by downloading the setup.exe file. Run the setup.exe file with your preferred installation settings. Once reaching the "Select Packages" screen, scroll down to the Editors node and expand it. Finally, find vim in the list and change the Skip option to Install. Next, just finish the install ation.
To install or upgrade vim on a Linux distribution, use the package manager of your choice (e.g. apt, yum, pacman, etc.). Typically the command will look something like:
1
| |
By default, the start of your vim configuration is found in $HOME/.vimrc; additional plugins, settings, etc. are found in $HOME/.vim. On Windows, $HOME is going to be %userprofile%, so something akin to C:\Users\Your Name\, and the .vim folder will be called vimfiles. This is due to the fact that NTFS directories are not supposed to start with periods.
We have compiled a base .vimrc file and relevant plugins. You can download these settings files here. Simply place them in your $HOME directory as described above. NOTE: If you already use vim and have existing dot files, you will have to manually merge the .vimrc.
This configuration uses Pathogen to load bundled plugins, so you should be able to integrate this with any existing plugins relatively easily.
If you've reached this point, you've now successfully installed and configured Vim. It should look something like this:
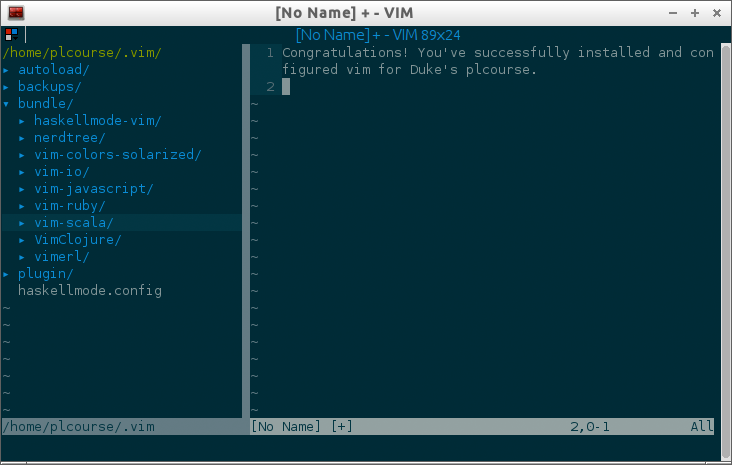
Note: The NERDTree plugin has been opened by issuing :NERDTreeToggle

Sublime Text 2 is an incredibly fast and powerful editor that's been replacing vim), emacs, and textmate for many. The community and ecosystem is passionate and vibrant, with developers writing packages for nearly everything. It's also freely available for all three major platforms, which makes it ideal for this class. You can download Sublime Text 2 from its website.
Sublime Text 2 supports Textmate Snippets, Syntax Highlighting, and other packages that made Textmate successful. However, Sublime Text 2 did not include a package manager out of the box. Developer @wbond has created a full-featured package manager that helps discovering, installing, updating and removing packages for Sublime Text 2.
To install Package Control, open up Sublime Text 2, and hit ctrl+' or click on View > Show Console to open up the Console. Once open, paste in the following command:
1
| |
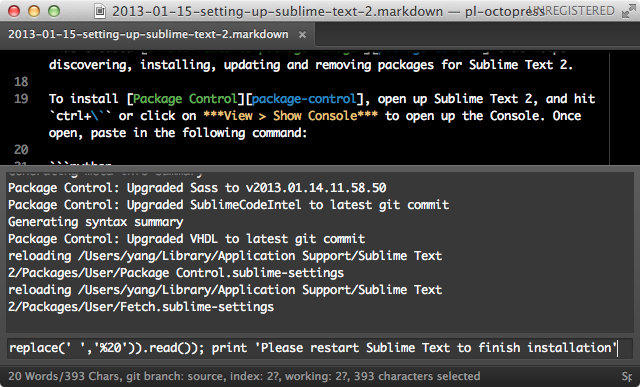
Note: ignore the text displayed in the console shown above.
Press enter to execute the code. Sublime text should display the message
Please restart Sublime Text to finish installation
After restarting Sublime Text 2, you should be able to use Package Control. For more detailed instructions on installation, see the Package Control Installation Guide.
You can access all the Package Control Commands with Sublime Text's Command Palette, which you can bring up with Control+Shift+P or Command+Shift+P on Mac.
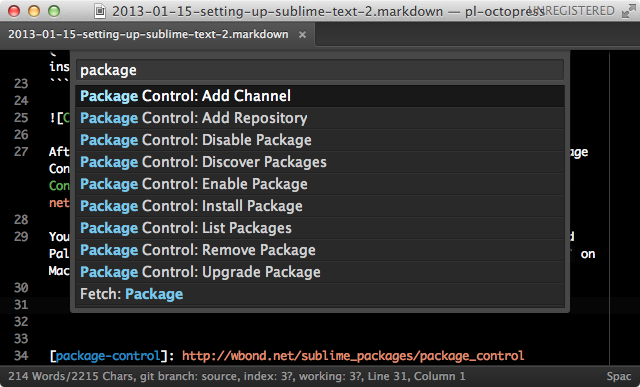
A detailed description of each command can be found here.
Sublime Text natively supports JavaScript, Ruby, Scala, Erlang, Clojure, and Haskell.
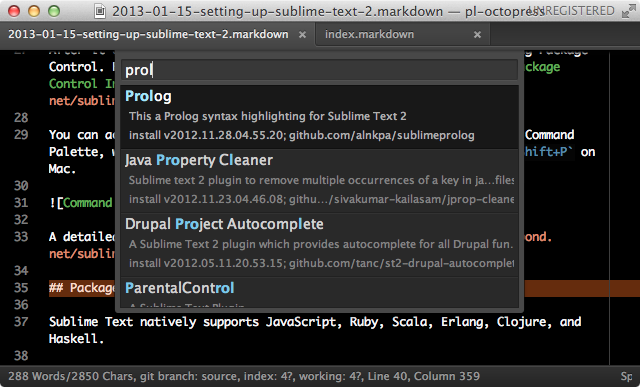
For Prolog, a syntax highlighting package has been created by @alnkpa. It can be installed by using Install Package from the Command Palette, which will bring up a separate window that lists all the available packages after a few seconds. Type in Prolog in the search and you should be able to see the package after a few key strokes. Select the Prolog package and press enter to install. Then that's it.
Sublime Text will recognize files that with the extensions pl or pro as Prolog source files. However, pl is commonly used as an extension for Perl and Sublime Text will select Perl as in the language instead of Prolog if you use a pl extension. As a result, we prefer to use pro.
As a side note, you can set the syntax of any source file at any time by using Command Palette > Set Syntax: (Language) to set the syntax of the current file to the language of your choice.
A package for Io has actually been created by one of the instructors @yangsu. Used Install Package to install a package called Io Langugae.
After the installation completes, Sublime Text will recognize any file with io extension as io source files. As noted above, you can also set the syntax of any source file to io with Command Palette > Set Syntax: (Language).
Tuts+ is an amazing collection of resources for almost everything related to technical or design knowledge. It's highly recommended for anyone trying to learn anything from Photoshop to Node.js. Tuts+ also has a whole network of sites with focuses in particular areas. Scroll to the bottom of the Tuts+ page, and you will be able to see all the available options.
NetTuts+ in particular has many great tutorials on Sublime Text. Two of the best articles are Sublime Text 2 Tips and Tricks and Essential Sublime Text 2 Plugins and Extensions.
You can also follow a free video series by Jeffrey Way on Tuts+ that goes over many of the topics covered in the two articles above and more.